簡述:分享Mac的WiFi給手機。打開分享時,需按住Option,分享才會有NAT64。
詳細方法,參考這篇的Test for IPv6 DNS64/NAT64 Compatibility Regularly。
值得注意,用USB線分享的話,會是IPv4+IPv6
簡述:分享Mac的WiFi給手機。打開分享時,需按住Option,分享才會有NAT64。
詳細方法,參考這篇的Test for IPv6 DNS64/NAT64 Compatibility Regularly。
值得注意,用USB線分享的話,會是IPv4+IPv6
使用JSONDecoder時,如果找不到Key值,錯誤如下
▿ DecodingError
  ▿ keyNotFound : 2 elements
    - .0 : CodingKeys(stringValue: "b", intValue: nil)
    ▿ .1 : Context
      - codingPath : 0 elements
      - debugDescription : "No value associated with key CodingKeys(stringValue: \"b\", intValue: nil) (\"b\")."
      - underlyingError : nil
其實只要利用KeyedDecodingContainer的decode(type:forKey)就可以解決這問題
protocol Init {
    init()
}

extension KeyedDecodingContainer {
    func decode<T: Codable & Init>(_ type: T.Type,
                forKey key: Key) throws -> T {
        try decodeIfPresent(type, forKey: key) ?? .init()
    }
}
之後只要將Codable後面,加上Init這個protocal就可以了
enum B: Int, Codable {
    case one = 1
    case two = 2
}


extension B: Init {
    init() {
        self = .one
    }
}


func startScan() {
let session = NFCNDEFReaderSession(delegate: self, queue: nil, invalidateAfterFirstRead: false)
session.alertMessage = "Hold your iPhone near an NFC transit card."
session.begin()
}
func readerSession(_ session: NFCNDEFReaderSession, didDetect tags: [NFCNDEFTag]) {
guard
let sms = "場所代碼:111111111111111 本次實聯簡訊限防疫目的使用。".addingPercentEncoding(withAllowedCharacters: .urlHostAllowed),
let payload = NFCNDEFPayload.wellKnownTypeURIPayload(string: "sms:1922&body=\(sms)"),
let tag = tags.first
else {
session.invalidate(errorMessage: "Could not process tag.")
return
}
session.connect(to: tag) { error in
guard error == nil else {
session.invalidate(errorMessage: "Could not connect to tag.")
return
}
tag.queryNDEFStatus { status, capacity, error in
guard error == nil else {
session.invalidate(errorMessage: "Could not query status of tag.")
return
}
switch status {
case .notSupported:
session.invalidate(errorMessage: "Tag is not supported.")
case .readOnly:
session.invalidate(errorMessage: "Tag is only readable.")
case .readWrite:
let messge = NFCNDEFMessage.init(records: [payload])
tag.writeNDEF(messge) { error in
if error != nil {
session.invalidate(errorMessage: "Failed to write message.")
} else {
session.alertMessage = "Successfully configured tag."
session.invalidate()
}
}
@unknown default: session.invalidate(errorMessage: "Unknown status of tag.")
}
}
}
}


let labelNode = SKLabelNode(text: "😘")
labelNode.horizontalAlignmentMode = .center
labelNode.verticalAlignmentMode = .center
labelNode.xScale = -1
let face = SKTransformNode()
face.addChild(labelNode)
self.face = face
let rotate = faceAnchor.transform.rotate
face?.setRotationMatrix(rotate)
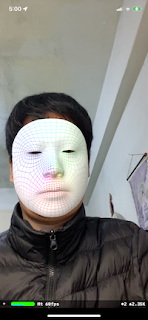
faceMesh?.firstMaterial?.diffuse.contents = UIImage(named: "wireframeTexture")

// Create a session configuration
let configuration = ARFaceTrackingConfiguration()
// Run the view's session
sceneView.session.run(configuration)
func renderer(_ renderer: SCNSceneRenderer, nodeFor anchor: ARAnchor) -> SCNNode? {
if anchor is ARFaceAnchor {
let faceMesh = ARSCNFaceGeometry(device: sceneView.device!)
faceMesh?.firstMaterial?.lightingModel = .physicallyBased
let node = SCNNode(geometry: faceMesh)
return node
} else {
return nil
}
}
func renderer(_ renderer: SCNSceneRenderer, didUpdate node: SCNNode, for anchor: ARAnchor) {
if let faceAnchor = anchor as? ARFaceAnchor, let faceGeometry = node.geometry as? ARSCNFaceGeometry {
faceGeometry.update(from: faceAnchor.geometry)
}
}
func session(_ session: ARSession, didUpdate frame: ARFrame) {
guard let arView = arView else {return}
// Do not enqueue other buffers for processing while another Vision task is still running.
// The camera stream has only a finite amount of buffers available; holding too many buffers for analysis would starve the camera.
guard currentBuffer == nil, case .normal = frame.camera.trackingState else {
return
}
// Retain the image buffer for Vision processing.
let currentBuffer = frame.capturedImage
}
let requestHandler = VNImageRequestHandler(cvPixelBuffer: currentBuffer, orientation: orientation)
visionQueue.async {
do {
// Perform VNDetectHumanHandPoseRequest
try requestHandler.perform([self.handPoseRequest])
// Continue only when a hand was detected in the frame.
// Since we set the maximumHandCount property of the request to 1, there will be at most one observation.
guard let observation = self.handPoseRequest.results?.first else {
return
}
// Get points for index finger.
let indexFingerPoints = try observation.recognizedPoints(.indexFinger)
// Look for tip points.
guard let indexTipPoint = indexFingerPoints[.indexTip] else {
return
}
// Ignore low confidence points.
guard indexTipPoint.confidence > 0.3 else {
return
}
} catch {
print("Error: Vision request failed with error \"\(error)\"")
}
}
// Convert points from Vision coordinates to ARView coordinates.
let point = indexTipPoint.location
let tip = CGPoint(x: point.x * width, y: (1 - point.y) * height)
arView.addGestureRecognizer(
UITapGestureRecognizer(
target: xxxx,
action: #selector(XXXX.handleTap(recognizer:))
)
)
@objc func handleTap(recognizer: UITapGestureRecognizer) {
let tapLocation = recognizer.location(in: arView)
let entity = arView.entity(at: tapLocation)
guard entity == boxAnchor?.steelBox else { return }
// entity 即點擊物件
}
UIAlert class is intended to be used as-is and does not support subclassing. The view hierarchy for this class is private and must not be modified.